
In this article you can read about applying Spring Security to the backend module of a Spring Boot and Angular app. Check out how to configure security, generate JWT tokens and protect API endpoints.
What we are going to build
In the Securing your Spring Boot and Angular app with JWT #1 – Introduction post you can find the description of the secured multi-module application which we are going to create.
In the Securing your Spring Boot and Angular app with JWT #3 – Frontend post you can find the details of safeguarding the frontend module.
The finished project is available in the GitHub repository – little-pinecone/jwt-spring-boot-angular-scaffolding.
In this post we are focusing on the backend module.
To keep the code snippets reasonably short in this post, I don’t include the imports and full tests here. You can find them in the source code so don’t hesitate to inspect the repo. |
Architecture overview
You can see the final directory tree for the backend module on the image below:

Get the base project
To get the code of the release 0.1.1 from the jwt-spring-boot-angular-scaffolding repository you can clone the project with this command:
|
1 |
$ git clone --branch v0.1.1 https://github.com/little-pinecone/jwt-spring-boot-angular-scaffolding.git |
It’s the starting point for securing the Cookie dispenser application.
Secure the backend
Right now all calls to the API are allowed, as you can see in this screenshot taken from Postman:

When we are done, the path http://localhost:8080/cookies will be available only for authenticated and authorized users.
Enable Spring Security
Add the dependency
Add the Spring Security dependency to the backend pom file:
|
1 2 3 4 5 6 7 |
<!--backend/pom.xml--> … <dependency> <groupId>org.springframework.boot</groupId> <artifactId>spring-boot-starter-security</artifactId> </dependency> … |
After rebuilding the project, all calls to the API should fail:

We’re getting the 401 Unauthorized error so the default security configuration works as intended.
Fix tests after enabling Spring Security
The CookieController has a test that won’t be executed properly after adding the security. We are getting the following error:
|
1 2 3 |
MockHttpServletResponse: Status = 401 Error message = Unauthorized |
To fix it, add the spring-security-test dependency to the backend pom file:
|
1 2 3 4 5 6 7 |
<!--backend/pom.xml--> … <dependency> <groupId>org.springframework.security</groupId> <artifactId>spring-security-test</artifactId> </dependency> … |
Furthermore, we need to add the @WithMockUser(roles = "USER") annotation to the test:
|
1 2 3 4 5 6 7 8 9 10 11 |
// backend/src/test/java/in/keepgrowing/jwtspringbootangularscaffolding/cookie/CookieControllerTest.java … @Test @WithMockUser(roles = "USER") public void getsCookies() throws Exception { mvc.perform(get("/api/cookies") .contentType(MediaType.APPLICATION_JSON)) .andExpect(jsonPath("$.[0].flavour", is("chocolate"))) .andExpect(jsonPath("$.[1].flavour", is("vanilla"))) .andExpect(status().isOk()); } |
After those changes the test execution should run without any further errors.
The work done in this section is contained in the commit 1d6b7c76360d2ad98ec02c1af0c63719dd29c87c.
Handle user registration
Create the model for User data
To create the User class, annotated as a JPA entity, we need the spring-boot-starter-data-jpa dependency added to our project:
|
1 2 3 4 5 6 7 |
<!--backend/pom.xml--> … <dependency> <groupId>org.springframework.boot</groupId> <artifactId>spring-boot-starter-data-jpa</artifactId> </dependency> … |
Create the User class and copy the following code to the file:
|
1 2 3 4 5 6 7 8 9 10 11 12 13 14 15 16 17 18 19 20 21 22 23 24 25 26 27 |
// backend/src/main/java/in/keepgrowing/jwtspringbootangularscaffolding/user/model/User.java … @Entity public class User { @Id @GeneratedValue(strategy = GenerationType.IDENTITY) private Long id; @Embedded private UserCredentials userCredentials; protected User() { } public User(UserCredentials userCredentials) { this.userCredentials = userCredentials; } public Long getId() { return id; } public UserCredentials getUserCredentials() { return userCredentials; } } |
The User entity has fields for an id and the embedded UserCredentials class. We need getters for the properties and two constructors. Methods: eguals(), hashCode() and toString() are omitted for the sake of brevity, don’t forget to generate them in your project.
Next we are going to add the class for username and password – create the UserCredentials class and copy the following code into it:
|
1 2 3 4 5 6 7 8 9 10 11 12 13 14 15 16 17 18 19 20 21 22 23 24 25 26 27 28 29 30 31 32 33 34 35 36 37 38 39 40 41 42 43 |
// backend/src/main/java/in/keepgrowing/jwtspringbootangularscaffolding/user/model/UserCredentials.java … @Embeddable public class UserCredentials { @NotBlank(message = "Provide a usernname") @Column(unique=true) private String username; @NotBlank(message = "Provide a password") private String password; private String role; UserCredentials() { } public UserCredentials(String username, String password, String role) { this.username = username; this.password = password; this.role = role; } public String getUsername() { return username; } public String getPassword() { return password; } public void setPassword(String password) { this.password = password; } public String getRole() { return role; } public void setRole(String role) { this.role = role; } } |
Again, eguals(), hashCode() and toString() are omitted in the code snippet above.
Create the UserRepository interface that extends CrudRepository to manage the persistence layer:
|
1 2 3 4 |
// backend/src/main/java/in/keepgrowing/jwtspringbootangularscaffolding/user/model/UserRepository.java … public interface UserRepository extends CrudRepository<User, Long> { } |
Provide business logic for handling users
The logic for creating a new user is enclosed in the UserService – we need to encrypt passwords, give every user a default role in the app and save users in a database. Copy the following code to your service:
|
1 2 3 4 5 6 7 8 9 10 11 12 13 14 15 16 17 18 19 20 21 22 23 24 25 |
// backend/src/main/java/in/keepgrowing/scrumally/user/UserService.java … @Service public class UserService { private static final String DEFAULT_ROLE = "ROLE_USER"; private UserRepository userRepository; private BCryptPasswordEncoder encoder; public UserService(UserRepository userRepository, BCryptPasswordEncoder encoder) { this.userRepository = userRepository; this.encoder = encoder; } public User register(User user) { setPasswordAndRole(user); return userRepository.save(user); } private void setPasswordAndRole(User user) { user.getUserCredentials() .setPassword(encoder.encode(user.getUserCredentials().getPassword())); user.getUserCredentials().setRole(DEFAULT_ROLE); } } |
To store encrypted passwords we need to create an encoder that is injected into the UserService. Create a new configuration file – PasswordEncoderConfig and declare the encoder bean in it, like in the following code snippet:
|
1 2 3 4 5 6 7 8 9 10 |
// backend/src/main/java/in/keepgrowing/jwtspringbootangularscaffolding/config/PasswordEncoderConfig.java … @Configuration public class PasswordEncoderConfig { @Bean public BCryptPasswordEncoder passwordEncoder() { return new BCryptPasswordEncoder(); } } |
Last but not least, create a REST controller to handle the registration requests. Copy the code from the UserController below:
|
1 2 3 4 5 6 7 8 9 10 11 12 13 14 15 16 17 |
// backend/src/main/java/in/keepgrowing/scrumally/user/UserController.java … @RestController @RequestMapping("api/users") public class UserController { private UserService userService; public UserController(UserService userService) { this.userService = userService; } @PostMapping public User register(@RequestBody User user) { return userService.register(user); } } |
This endpoint enables new users to register by using the UserService we provided.
Configure security
We need to override the default security configuration to specify which requests require authorization and how to handle forbidden API calls. In our case, we also need to provide the possibility to apply CORS configuration depending on the environment. Create the SecurityConfig file and copy the following code:
|
1 2 3 4 5 6 7 8 9 10 11 12 13 14 15 16 17 18 19 20 21 22 23 24 25 26 27 28 29 30 31 32 33 34 |
// backend/src/main/java/in/keepgrowing/jwtspringbootangularscaffolding/config/SecurityConfig.java … @Configuration public class SecurityConfig extends WebSecurityConfigurerAdapter { @Value("${cors.enabled:false}") private boolean corsEnabled; @Override protected void configure(HttpSecurity httpSecurity) throws Exception { applyCors(httpSecurity) .csrf().disable() .sessionManagement().sessionCreationPolicy(SessionCreationPolicy.STATELESS) .and() .exceptionHandling().authenticationEntryPoint(unauthorizedResponse()) .and() .authorizeRequests() .antMatchers(HttpMethod.POST, "/api/users").permitAll() .antMatchers("/api/**").authenticated() .anyRequest().permitAll(); } private HttpSecurity applyCors(HttpSecurity httpSecurity) throws Exception { if (corsEnabled) { return httpSecurity.cors().and(); } else { return httpSecurity; } } private AuthenticationEntryPoint unauthorizedResponse() { return (req, rsp, e) -> rsp.sendError(HttpServletResponse.SC_UNAUTHORIZED); } } |
All API requests, apart from the one for user registration ( .antMatchers(HttpMethod.POST, "/api/users").permitAll() ), are secured.
If we decide to serve something on paths other than http://localhost:8080/api/** (e.g. a landing page on http://localhost:8080/ ) the authentication won’t be required.
In case of not authorized calls to the API, the server will return a response with 401 status and “Unauthorized” error.
We use
@Value("${cors.enabled:false}") to disable CORS on the production environment. To change it during development, we need to create the application-development.properties file and copy the following property there:
|
1 2 |
# backend/src/main/resources/application-development.properties cors.enabled=true |
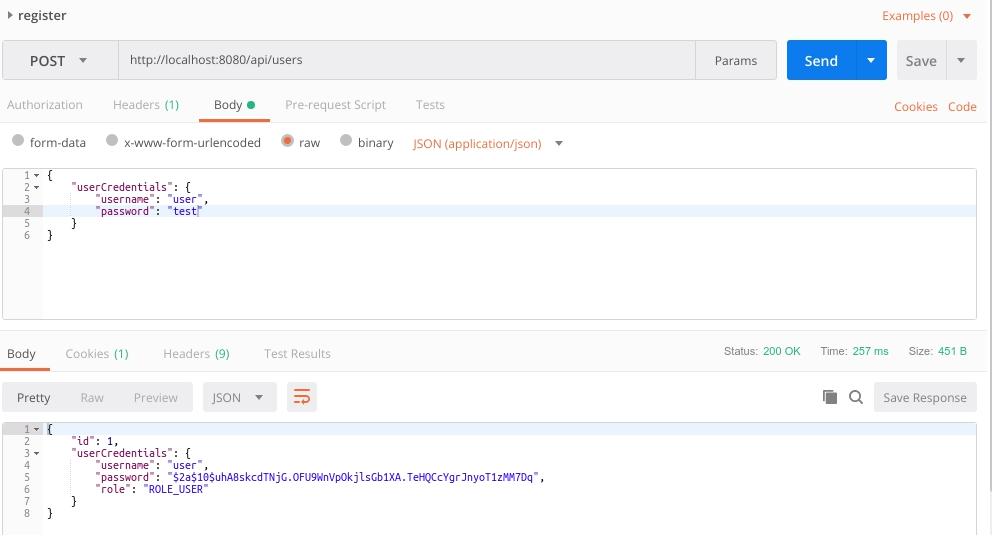
Now we can test the request creating a new user:
The work done in this section is contained in the commit 40e2d0ec5745cb0605a5c59525b8628cf2df0dc7.
The commit contains also all tests for UserController and UserService, remember to include them in your code. |
Add JWT
Include the dependency and define token properties
Start with adding the dependency for JWT:
|
1 2 3 4 5 6 7 8 |
<!--backend/pom.xml--> … <dependency> <groupId>io.jsonwebtoken</groupId> <artifactId>jjwt</artifactId> <version>0.9.1</version> </dependency> … |
We will define token properties and initialize them with the following default values in the TokenProperties component:
|
1 2 3 4 5 6 7 8 9 10 11 12 13 14 15 16 17 18 |
// backend/src/main/java/in/keepgrowing/jwtspringbootangularscaffolding/security/TokenProperties.java … @Component @ConfigurationProperties(prefix = "security.jwt") public class TokenProperties { private String loginPath = "/api/login"; private String header = "Authorization"; private String prefix = "Bearer "; private int expiration = 86400; private String secret = "JwtSecretKey"; // Getters and setters omitted for the sake of brevity } |
Remember to annotate it with @ConfigurationProperties to bind the external configuration to this class so you can set your own expiration time and secret in the production environment:
|
1 2 3 |
# backend/src/main/resources/application.properties security.jwt.expiration=your_value security.jwt.secret=your_value |
Enable searching for a user during the authentication process
In the UserRepository interface declare the method for getting a user by a username:
|
1 2 3 |
// backend/src/main/java/in/keepgrowing/jwtspringbootangularscaffolding/user/model/UserRepository.java … Optional<User> findByUserCredentialsUsername(String username); |
And use it in the UserService class.
|
1 2 3 4 5 |
// backend/src/main/java/in/keepgrowing/jwtspringbootangularscaffolding/user/UserService.java … public Optional<User> findByUsername(String username) { return userRepository.findByUserCredentialsUsername(username); } |
We are going to use our implementation of findByUsername() function during authentication. In order to achieve that we need to create the UserDetailService interface implementation, override its loadUserByUsername() function and inject our UserService to access the method we’ve created above.
Copy the following code to enable fetching a UserDetails object with complete credentials and granted authorities. In case of requesting for a not existing user a UsernameNotFoundException is thrown:
|
1 2 3 4 5 6 7 8 9 10 11 12 13 14 15 16 17 18 19 20 21 22 23 24 25 26 27 28 29 30 |
// backend/src/main/java/in/keepgrowing/jwtspringbootangularscaffolding/security/CustomUserDetailsService.java … @Service public class CustomUserDetailsService implements UserDetailsService { private UserService userService; public CustomUserDetailsService(UserService userService) { this.userService = userService; } @Override public UserDetails loadUserByUsername(String username) throws UsernameNotFoundException { return userService.findByUsername(username) .map(this::getUserDetails) .orElseThrow(() -> new UsernameNotFoundException(String.format("Username: %s not found", username))); } private org.springframework.security.core.userdetails.User getUserDetails(User u) { return new org.springframework.security.core.userdetails.User( u.getUserCredentials().getUsername(), u.getUserCredentials().getPassword(), getGrantedAuthorities(u)); } private List<GrantedAuthority> getGrantedAuthorities(User u) { return AuthorityUtils .commaSeparatedStringToAuthorityList(u.getUserCredentials().getRole()); } } |
Add AuthenticationFilter
Create the AuthenticationFilter class that extends UsernamePasswordAuthenticationFilter (Spring Boot will automatically place our filter in the most suitable position in the Security Filter Chain) and initialize all essential properties in its constructor:
|
1 2 3 4 5 6 7 8 9 10 11 12 13 14 15 16 17 18 19 20 |
// backend/src/main/java/in/keepgrowing/jwtspringbootangularscaffolding/security/AuthenticationFilter.java … public class AuthenticationFilter extends UsernamePasswordAuthenticationFilter { private final ObjectMapper objectMapper; private final AuthenticationManager authenticationManager; private final TokenProperties tokenProperties; public AuthenticationFilter(AuthenticationManager authenticationManager, TokenProperties tokenProperties) { objectMapper = new ObjectMapper(); this.authenticationManager = authenticationManager; this.tokenProperties = tokenProperties; setLoginPath(tokenProperties); } private void setLoginPath(TokenProperties tokenProperties) { setRequiresAuthenticationRequestMatcher( new AntPathRequestMatcher(tokenProperties.getLoginPath(), "POST")); } … } |
Now we can override the attemptAuthentication() function that is called whenever the API gets a request to the login path. Let’s extract the credentials sent in a request and use it to generate the UsernamePasswordAuthenticationToken instance that we pass to the authenticationManager:
|
1 2 3 4 5 6 7 8 9 10 11 12 13 14 15 16 17 18 19 20 21 22 23 24 25 26 |
// backend/src/main/java/in/keepgrowing/jwtspringbootangularscaffolding/security/AuthenticationFilter.java … @Override public Authentication attemptAuthentication(HttpServletRequest request, HttpServletResponse response) throws AuthenticationException { try { UserCredentials credentials = getCredentials(request); UsernamePasswordAuthenticationToken token = createAuthenticationToken(credentials); return authenticationManager.authenticate(token); } catch (IOException e) { throw new RuntimeException(e); } } private UserCredentials getCredentials(HttpServletRequest request) throws IOException { return objectMapper.readValue(request.getInputStream(), UserCredentials.class); } private UsernamePasswordAuthenticationToken createAuthenticationToken(UserCredentials credentials) { return new UsernamePasswordAuthenticationToken( credentials.getUsername(), credentials.getPassword(), Collections.emptyList() ); } … |
We will also override the successfulAuthentication() function to add the Authorization header with the JWT token data to the response. The header is prefixed with “Bearer ” from the TokenProperties configuration and contains the complete token built with the Jwts.builder(). The createToken() function is also the place where you can specify the signing algorithm. Copy the following code to the AuthenticationFilter.java file:
|
1 2 3 4 5 6 7 8 9 10 11 12 13 14 15 16 17 18 19 20 21 22 23 24 |
// backend/src/main/java/in/keepgrowing/jwtspringbootangularscaffolding/security/AuthenticationFilter.java … @Override protected void successfulAuthentication(HttpServletRequest request, HttpServletResponse response, FilterChain chain, Authentication auth) { response.addHeader(tokenProperties.getHeader(), tokenProperties.getPrefix() + createToken(auth)); } private String createToken(Authentication auth) { long now = System.currentTimeMillis(); List<String> authorities = auth.getAuthorities().stream() .map(GrantedAuthority::getAuthority) .collect(Collectors.toList()); return Jwts.builder() .setSubject(auth.getName()) .claim("authorities", authorities) .setIssuedAt(new Date(now)) .setExpiration(new Date(now + tokenProperties.getExpiration() * 1000)) .signWith(SignatureAlgorithm.HS512, tokenProperties.getSecret().getBytes()) .compact(); } … |
Add AuthorizationFilter
Create the AuthorizationFilter class that extends OncePerRequestFilter and inject the TokenProperties instance to it:
|
1 2 3 4 5 6 7 8 9 10 11 |
// backend/src/main/java/in/keepgrowing/jwtspringbootangularscaffolding/security/AuthorizationFilter.java … public class AuthorizationFilter extends OncePerRequestFilter { private final TokenProperties tokenProperties; public AuthorizationFilter(TokenProperties tokenProperties) { this.tokenProperties = tokenProperties; } … } |
We need to override the doFilterInternal() function to extract the Authorization header from a request. Let’s stop for a moment and investigate the logic here. If the Authorization header is found we verify whether a user that sent the request is authorized to access the content:
|
1 2 3 4 5 6 7 8 9 10 11 12 13 14 15 16 17 18 19 20 21 22 23 24 25 26 |
// backend/src/main/java/in/keepgrowing/jwtspringbootangularscaffolding/security/AuthorizationFilter.java … @Override protected void doFilterInternal(HttpServletRequest httpServletRequest, HttpServletResponse httpServletResponse, FilterChain filterChain ) throws ServletException, IOException { String header = httpServletRequest.getHeader(tokenProperties.getHeader()); if (headerIsValid(header)) { try { Claims claims = getClaims(getToken(header)); Optional.ofNullable(claims.getSubject()) .ifPresent(username -> setUserContext(claims, username)); } catch (Exception e) { SecurityContextHolder.clearContext(); } } goToNextFilter(httpServletRequest, httpServletResponse, filterChain); } private boolean headerIsValid(String header) { return header != null && header.startsWith(tokenProperties.getPrefix()); } … |
First we parse the token after removing the “Bearer ” prefix from it:
|
1 2 3 4 5 6 7 8 9 10 11 12 13 |
// backend/src/main/java/in/keepgrowing/jwtspringbootangularscaffolding/security/AuthorizationFilter.java … private Claims getClaims(String token) { return Jwts.parser() .setSigningKey(tokenProperties.getSecret().getBytes()) .parseClaimsJws(token) .getBody(); } private String getToken(String header) { return header.replace(tokenProperties.getPrefix(), ""); } … |
If the claims subject (principal) is present we can set the user context for the authorized user:
|
1 2 3 4 5 6 7 8 9 10 11 12 13 14 15 16 17 18 19 |
// backend/src/main/java/in/keepgrowing/jwtspringbootangularscaffolding/security/AuthorizationFilter.java … private void setUserContext(Claims claims, String username) { User userDetails = new User(username, "", Collections.emptyList()); UsernamePasswordAuthenticationToken auth = new UsernamePasswordAuthenticationToken( userDetails, null, getGrantedAuthorities(claims) ); SecurityContextHolder.getContext().setAuthentication(auth); } @SuppressWarnings("unchecked") private List<SimpleGrantedAuthority> getGrantedAuthorities(Claims claims) { return ((List<String>) claims.get("authorities")).stream() .map(SimpleGrantedAuthority::new) .collect(Collectors.toList()); } … |
And finally we have to pass the control to the next filter from the filterChain:
|
1 2 3 4 5 6 7 |
// backend/src/main/java/in/keepgrowing/jwtspringbootangularscaffolding/security/AuthorizationFilter.java … private void goToNextFilter(HttpServletRequest httpServletRequest, HttpServletResponse httpServletResponse, FilterChain filterChain) throws IOException, ServletException { filterChain.doFilter(httpServletRequest, httpServletResponse); } … |
Update the security configuration
Change the class annotation to @EnableWebSecurity, add the following properties and constructor to the code:
|
1 2 3 4 5 6 7 8 9 10 11 12 13 14 15 16 17 |
// backend/src/main/java/in/keepgrowing/jwtspringbootangularscaffolding/config/SecurityConfig.java … @EnableWebSecurity public class SecurityConfig extends WebSecurityConfigurerAdapter { … private final TokenProperties tokenProperties; private final BCryptPasswordEncoder passwordEncoder; private final CustomUserDetailsService userDetailsService; public SecurityConfig(TokenProperties tokenProperties, BCryptPasswordEncoder passwordEncoder, CustomUserDetailsService userDetailsService) { this.tokenProperties = tokenProperties; this.passwordEncoder = passwordEncoder; this.userDetailsService = userDetailsService; } … |
To the configure() method we are going to add:
logout()functionality – line 11;AuthenticationFilter– line 13;AuthorizationFilter– line 14;- a matcher to the
loginpath that is available for all users – line 16; - a matcher to restrain all requests (other than registration) that are related to the
"/api/users/**"endpoint to be accessible only to a user with the ADMIN role – line 18.
The method should look like the one on the code snippet below:
|
1 2 3 4 5 6 7 8 9 10 11 12 13 14 15 16 17 18 19 20 21 22 |
// backend/src/main/java/in/keepgrowing/jwtspringbootangularscaffolding/config/SecurityConfig.java … @Override protected void configure(HttpSecurity httpSecurity) throws Exception { applyCors(httpSecurity) .csrf().disable() .sessionManagement().sessionCreationPolicy(SessionCreationPolicy.STATELESS) .and() .exceptionHandling().authenticationEntryPoint(unauthorizedResponse()) .and() .logout() .and() .addFilter(new AuthenticationFilter(authenticationManagerBean(), tokenProperties)) .addFilterAfter(new AuthorizationFilter(tokenProperties), UsernamePasswordAuthenticationFilter.class) .authorizeRequests() .antMatchers(HttpMethod.POST, tokenProperties.getLoginPath()).permitAll() .antMatchers(HttpMethod.POST, "/api/users").permitAll() .antMatchers("/api/users/**").hasRole("ADMIN") .antMatchers("/api/**").authenticated() .anyRequest().permitAll(); } … |
Allow usage of your custom userDetailService with BCryptPasswordEncoder:
|
1 2 3 4 5 6 7 |
// backend/src/main/java/in/keepgrowing/jwtspringbootangularscaffolding/config/SecurityConfig.java … @Override protected void configure(AuthenticationManagerBuilder auth) throws Exception { auth.userDetailsService(userDetailsService).passwordEncoder(passwordEncoder); } … |
Check out the login functionality
Rebuild the application, register a test user and test the login functionality:

Copy the token value from the Authorization header, and use it to display the secured pastry – change the Authorization Type to the Bearer Token and paste the token value:

Fix the tests
When we try to run tests, e.g. for the UserController class, we will get the following error in the console:
|
1 2 3 4 5 6 7 8 9 |
*************************** APPLICATION FAILED TO START *************************** Description: Parameter 0 of constructor in in.keepgrowing.jwtspringbootangularscaffolding.config.SecurityConfig required a bean of type 'in.keepgrowing.jwtspringbootangularscaffolding.security.TokenProperties' that could not be found. Action: Consider defining a bean of type 'in.keepgrowing.jwtspringbootangularscaffolding.security.TokenProperties' in your configuration. … o.s.test.context.TestContextManager : Caught exception while allowing TestExecutionListener [org.springframework.boot.test.mock.mockito.MockitoTestExecutionListener@198d6542] to prepare test instance [in.keepgrowing.jwtspringbootangularscaffolding.user.UserControllerTest@73fbdf68] |
We need to add the dependencies we already injected to the SecurityConfig and the config class itself.
Update UserControllerTestwith the @Import() annotation:
|
1 2 3 4 5 6 |
// backend/src/test/java/in/keepgrowing/jwtspringbootangularscaffolding/user/UserControllerTest.java … @Import({TokenProperties.class, BCryptPasswordEncoder.class, CustomUserDetailsService.class, SecurityConfig.class}) public class UserControllerTest { … } |
Update CookieControllerTestwith the @Import() annotation and inject a Mock for the UserService:
|
1 2 3 4 5 6 7 8 9 |
// backend/src/test/java/in/keepgrowing/jwtspringbootangularscaffolding/cookie/CookieControllerTest.java … @Import({TokenProperties.class, BCryptPasswordEncoder.class, CustomUserDetailsService.class, SecurityConfig.class}) public class CookieControllerTest { … @MockBean private UserService userService; … } |
The work done in this section is contained in the commits 6b4c29c6c11ca0cf435203475cde4f6d1809c6bf. The necessary fixes are added in the commits: 1b80e70533f4823086c7aefb556884452aa311e9 and 0eba82766d98ca5c242d8a07467139a0dab3038b.
Photo by Matheus Bertelli on StockSnap
Hi,
I got problem with logout function, can you help me?
java.io.FileNotFoundException: class path resource [static/index.html] cannot be resolved to URL because it does not exist
at org.springframework.core.io.ClassPathResource.getURL(ClassPathResource.java:195) ~[spring-core-5.1.3.RELEASE.jar:5.1.3.RELEASE]
at org.springframework.core.io.AbstractFileResolvingResource.lastModified(AbstractFileResolvingResource.java:247) ~[spring-core-5.1.3.RELEASE.jar:5.1.3.RELEASE]
at org.springframework.web.servlet.resource.ResourceHttpRequestHandler.handleRequest(ResourceHttpRequestHandler.java:467) ~[spring-webmvc-5.1.3.RELEASE.jar:5.1.3.RELEASE]
Hi,
If you are building a project on your own, remember to surrender the routing control to Angular. Check out this post – Make Spring Boot surrender routing control to Angular. This feature is already implemented in this project and the configuration is in the MvcConfiguration file.
You can also check out these two commits:
* ea11fb6a53b3b1575673669d76fd0bb2f65f4c0e
* 3cd0850b40798fbacc93d955f81938d8a8aa31fc (small bugfix)
Maybe your project is missing something that is not described in this post (I wanted to keep it as concise as possible)?
You can always clone the whole project and checkout to the commit where login and logout functionality works:
$ git checkout 6b4c29c6c11ca0cf435203475cde4f6d1809c6bf
It contains most of the code described in this post.
Logout requires a valid jwt token (otherwise it will result in 401 error).
All in all, make sure that Spring Boot surrenders routing control to Angular and you have no issues with CORS (Fix CORS issues between Spring Boot and Angular on localhost).
I hope you will fix the issue in no time 🙂
Regards, little_pinecone
Hi Marta,
I had solved my issue by way remove the token in Local Storage and redirect to login page 🙂 But now I have another problem called refresh or update expired JWT, can you point me or create a guide how to refresh token? Thank you so much!
Thank you for sharing the issue and the solution 🙂 Regarding the token refreshing, I haven’t quite figured it out yet but it’s on my todo list. “Silent authentication” is a way to solve this issue but it is a complex subject and I haven’t found an existing tutorial/resources that would work on my JWT-Spring Boot-Angular example project. As soon as I have a satisfying solution, I will share it.
This was an extremely helpful guide! I am bookmarking your blog. Would love to see you add a registration page if you happen to be looking for an idea for your next guide.
Thank you for putting this together!