Swagger offers various methods to authorize requests to our Keycloak secured API. I’ll show you how to implement the recommended grant types and why certain flows are advised against in the OAuth 2.0 specification.
Prerequisites
- The security configuration for Keycloak is described in the Keycloak with Spring Boot #1 – Configure Spring Security with Keycloak post.
- You’ll need Swagger UI in your project. I’m using the springdoc-openapi dependency in my example:
|
1 2 3 4 5 6 7 8 9 10 11 12 13 14 15 16 |
<!-- pom.xml --> … <properties> … <springdoc.version>1.6.6</springdoc.version> </properties> … <dependencies> … <dependency> <groupId>org.springdoc</groupId> <artifactId>springdoc-openapi-ui</artifactId> <version>${springdoc.version}</version> </dependency> </dependencies> … |
As a result, I have Swagger UI at http://localhost:8080/swagger-ui.html and OpenAPI specification at http://localhost:8080/v3/api-docs. For more information on documenting Spring Boot applications using Springdoc, see the Easy OpenAPI 3 specification for your Spring Boot REST API article.
Authorize Swagger requests in Keycloak
I’ll demonstrate three authorization configurations:
Authorization Codewhich is one of the OAuth 2.0 flows,OpenID Connect Discoverymechanism,Bearer Authentication.
Select the one that better suits the needs of your project. In the end, we want to end up with the Authorize button that will provide authorization options suitable for our API and Keycloak server:
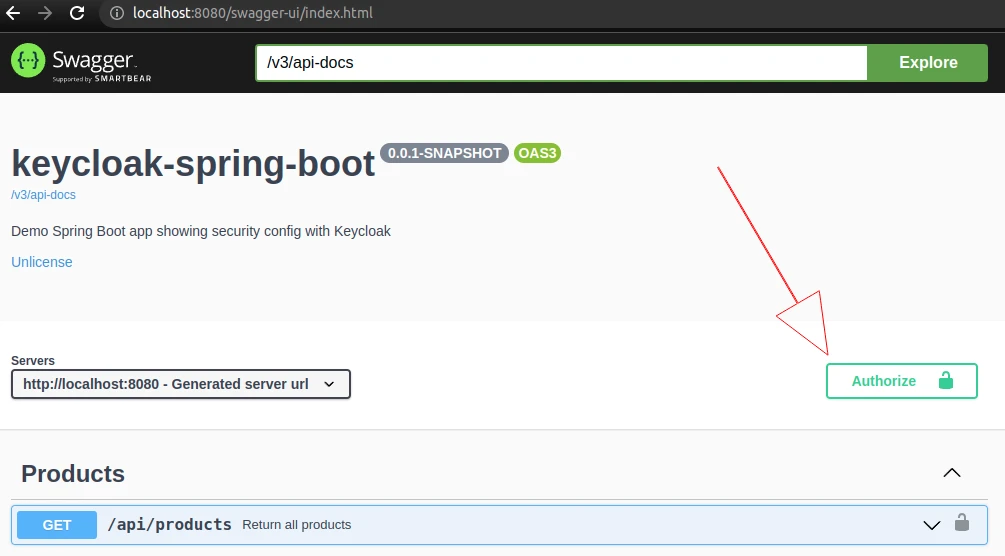
Allow access to Swagger endpoints
I’m going to modify my SecurityConfig class to allow Swagger endpoints to be called without authentication:
|
1 2 3 4 5 6 7 8 9 10 11 12 13 14 15 16 17 18 19 20 21 22 23 |
package in.keepgrowing.keycloakspringboot.security.config; public class SecurityConfig extends KeycloakWebSecurityConfigurerAdapter { private static final String[] SWAGGER_WHITELIST = { "/v3/api-docs/**", "/swagger-ui/**", "/swagger-ui.html", }; public static void configureApiSecurity(HttpSecurity http) throws Exception { http … .antMatchers(SWAGGER_WHITELIST).permitAll() .anyRequest().authenticated(); } @Override protected void configure(HttpSecurity http) throws Exception { super.configure(http); configureApiSecurity(http); } … |
Provide Keycloak server details
Authorizatin Code and OpenID Connect Disvovery require realm name and the url of the Keycloak server for proper configuration. Although we can provide them as hardcoded strings for testing purposes, I’m going to reuse the data that’s already available in my application.properties file:
|
1 2 3 4 |
# application.properties keycloak.realm=keep-growing keycloak.auth-server-url=http://localhost:8024/auth … |
To access the properties in the code, I’m going to create the following short record:
|
1 2 3 4 5 6 7 8 9 |
package in.keepgrowing.keycloakspringboot.security.config; import org.springframework.boot.context.properties.ConfigurationProperties; @ConfigurationProperties(prefix = "keycloak") public record KeycloakProperties( String authServerUrl, String realm) { } |
That’s all we need to inject these properties into our Swagger config if our project uses a Java version with Record support. Alternatively, follow the Type-safe Configuration Properties::Constructor Binding section in the Spring docs to use a simple class (with getters and @ConstructorBinding annotation).
Thanks to this, I only provide Keycloak details in one place and I don’t have to painstakingly search my configuration classes to update the values. Additionally, the properties will always be in accordance with the selected application profile (dev, production, etc.).
Swagger authorization with the OAuth 2.0 protocol
The example implementation is available in the keycloak-spring-boot repository.
First of all, I’m going to consult the Swagger docs for a quick summary of the authorization flows available:
The flows (also called grant types) are scenarios an API client performs to get an access token from the authorization server. OAuth 2.0 provides several flows suitable for different types of API clients:
https://swagger.io/docs/specification/authentication/oauth2/
– Authorization code,
– Implicit,
– Resource owner password credentials,
– Client credentials.
I’m going to provide the configuration for the Authorization Code Grant as this is the most secure option for my Swagger API calls. The following quote contains a brief explanation of this flow:
When the user authorizes the application, they are redirected back to the application with a temporary code in the URL. The application exchanges that code for the access token. When the application makes the request for the access token, that request can be authenticated with the client secret, which reduces the risk of an attacker intercepting the authorization code and using it themselves.
https://www.oauth.com/oauth2-servers/server-side-apps/authorization-code/
This also means the access token is never visible to the user or their browser, so it is the most secure way to pass the token back to the application, reducing the risk of the token leaking to someone else.
Make sure that the Standard Flow is enabled in Keycloak as it allows us to use the Authorization Code flow:

Configuration class
Let’s look at the example configuration documented in Swagger:
|
1 2 3 4 5 6 7 8 9 10 11 12 |
components: securitySchemes: oAuth2AuthCode: type: oauth2 description: For more information, see https://api.slack.com/docs/oauth flows: authorizationCode: authorizationUrl: https://slack.com/oauth/authorize tokenUrl: https://slack.com/api/oauth.access scopes: users:read: Read user information … |
In other words, in order to authorize requests in Keycloak, Swagger requires a component containing a security scheme with a particular flow. Based on this, I can provide my own setup in Java. Below you can see the full configuration class:
|
1 2 3 4 5 6 7 8 9 10 11 12 13 14 15 16 17 18 19 20 21 22 23 24 25 26 27 28 29 30 31 32 33 34 35 36 37 38 39 40 41 42 43 44 45 46 47 48 49 |
package in.keepgrowing.keycloakspringboot.documentation.config; import in.keepgrowing.keycloakspringboot.security.config.KeycloakProperties; import io.swagger.v3.oas.annotations.OpenAPIDefinition; import io.swagger.v3.oas.models.Components; import io.swagger.v3.oas.models.OpenAPI; import io.swagger.v3.oas.models.security.*; import org.springframework.context.annotation.Bean; import org.springframework.context.annotation.Configuration; @Configuration @OpenAPIDefinition public class SwaggerConfig { private static final String OAUTH_SCHEME_NAME = "oAuth"; private static final String PROTOCOL_URL_FORMAT = "%s/realms/%s/protocol/openid-connect"; @Bean public OpenAPI customOpenApi(KeycloakProperties keycloakProperties) { return new OpenAPI() .components(new Components() //1 .addSecuritySchemes(OAUTH_SCHEME_NAME, createOAuthScheme(keycloakProperties))) .addSecurityItem(new SecurityRequirement().addList(OAUTH_SCHEME_NAME)); } private SecurityScheme createOAuthScheme(KeycloakProperties properties) { OAuthFlows flows = createOAuthFlows(properties); //3a return new SecurityScheme() //2 .type(SecurityScheme.Type.OAUTH2) .flows(flows); } private OAuthFlows createOAuthFlows(KeycloakProperties properties) { OAuthFlow flow = createAuthorizationCodeFlow(properties); return new OAuthFlows() .authorizationCode(flow); } private OAuthFlow createAuthorizationCodeFlow(KeycloakProperties properties) { var protocolUrl = String.format(PROTOCOL_URL_FORMAT, properties.authServerUrl(), properties.realm()); return new OAuthFlow()//3b .authorizationUrl(protocolUrl + "/auth") .tokenUrl(protocolUrl + "/token") .scopes(new Scopes().addString("openid", "")); } } |
There are a few things to note:
- Components – a collection of reusable objects that define various aspects of the Open API Specification.
- SecuritySceme – here we can define our scheme type with the
Authorization Codeflow. - OAuthflow – an object for specifying the configuration details of the selected flow. We have to follow the list of the required fields for each auth type from the screenshot below:

As a result, we’ll see that the Authiorization Code Grant will be the only available auth option in Swagger UI:
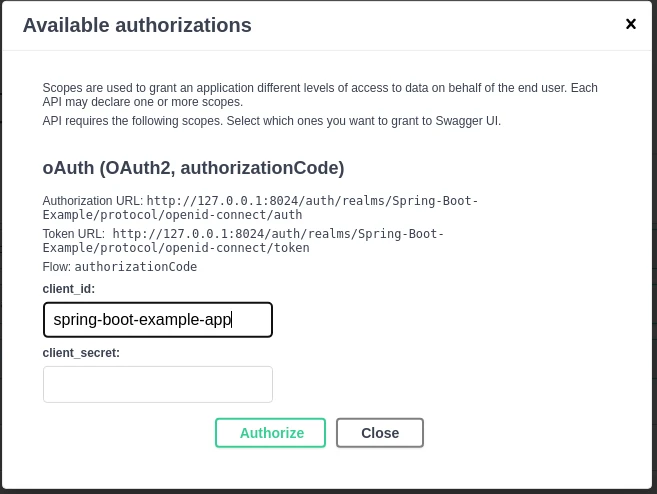
Adding Scopes to the config
In the screenshot with required fields for the OAuth flow, we can read that scopes field is just a map between their names and descriptions:

Therefore, if you want to provide a scope, e.g. address, you need to add it when creating the authorization flow:
|
1 2 3 4 5 6 7 8 9 |
… private OAuthFlow createAuthorizationCodeFlow(KeycloakProperties properties) { var protocolUrl = String.format(PROTOCOL_URL_FORMAT, properties.getAuthServerUrl(), properties.getRealm()); return new OAuthFlow() .authorizationUrl(protocolUrl + "/auth") .tokenUrl(protocolUrl + "/token") .scopes(new Scopes().addString("address", "")); } |
As a consequence, the list of scopes will appear in the Swagger authorization window after restarting the application:

Another thing to remember is that if you don’t add the openid scope, you’ll get the following warning in the keycloak instance’s logs:
|
1 |
Request is missing scope 'openid' so it's not treated as OIDC, but just pure OAuth2 request. |
As a result, the requests are still valid OAuth2 requests. However, the behaviour might be unpredictable if you rely on the OIDC standard.
Swagger authorization with the OpenID Connect Discovery mechanism
The example implementation is available in the spring-boot-swagger-ui-keycloak repository.
If you need more security schemes available in Swagger UI, you can easily achieve it with the OIDC discovery mechanism. It takes advantage of the fact that the OpenID server publishes its metadata to a well-known url:
This specification defines a mechanism for an OpenID Connect Relying Party to discover the End-User’s OpenID Provider and obtain information needed to interact with it, including its OAuth 2.0 endpoint locations.
https://openid.net/specs/openid-connect-discovery-1_0.html
In order to find the correct endpoint for your Keycloak realm, select the OpenID Endpoint Configuration option in the realm settings:
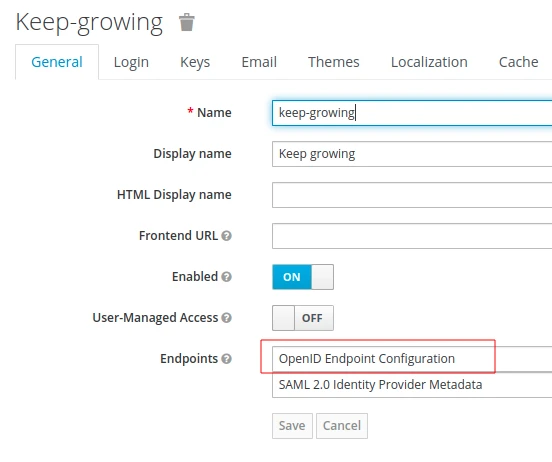
In other words, the http://localhost:8024/auth/realms/keep-growing/.well-known/openid-configuration url contains the data required by the discovery mechanism to identify all available authorization schemes:

Configuration class
Let’s look at the example configuration documented in Swagger:
|
1 2 3 4 5 6 |
components: securitySchemes: openId: # <--- Arbitrary name for the security scheme. Used to refer to it from elsewhere. type: openIdConnect openIdConnectUrl: https://example.com/.well-known/openid-configuration … |
The config for this security scheme is very short because all necessary information will be automatically acquired form the OpenID configuration endpoint:
|
1 2 3 4 5 6 7 8 9 10 11 12 13 14 15 16 17 18 19 20 21 22 23 24 25 26 27 28 29 30 31 32 33 34 |
package in.keepgrowing.springbootswaggeruikeycloak.shared.infrastructure.config.swagger.authorization; import in.keepgrowing.springbootswaggeruikeycloak.shared.infrastructure.config.security.KeycloakProperties; import io.swagger.v3.oas.annotations.OpenAPIDefinition; import io.swagger.v3.oas.models.Components; import io.swagger.v3.oas.models.OpenAPI; import io.swagger.v3.oas.models.security.SecurityRequirement; import io.swagger.v3.oas.models.security.SecurityScheme; import org.springframework.context.annotation.Bean; import org.springframework.context.annotation.Configuration; @Configuration @OpenAPIDefinition public class SwaggerOpenIdConfig { private static final String OPEN_ID_SCHEME_NAME = "openId"; private static final String OPENID_CONFIG_FORMAT = "%s/realms/%s/.well-known/openid-configuration"; @Bean OpenAPI customOpenApi(KeycloakProperties keycloakProperties) { return new OpenAPI() .components(new Components() .addSecuritySchemes(OPEN_ID_SCHEME_NAME, createOpenIdScheme(keycloakProperties))) .addSecurityItem(new SecurityRequirement().addList(OPEN_ID_SCHEME_NAME)); } private SecurityScheme createOpenIdScheme(KeycloakProperties properties) { String connectUrl = String.format(OPENID_CONFIG_FORMAT, properties.getAuthServerUrl(), properties.getRealm()); return new SecurityScheme() .type(SecurityScheme.Type.OPENIDCONNECT) .openIdConnectUrl(connectUrl); } } |
As a result, I will see all the available authorizations in my Swagger UI:

Swagger authorization with bearer token
The example implementation is available in the spring-boot-swagger-ui-keycloak repository.
What if we already have access tokens from Keycloak? We can configure Swagger UI to allow us to provide only the bearer token value. Remember to provide the recommended security features for this authorization approach:
Similarly to Basic authentication, Bearer authentication should only be used over HTTPS (SSL).
https://swagger.io/docs/specification/authentication/bearer-authentication/
Configuration class
Let’s look at the example configuration documented in Swagger:
|
1 2 3 4 5 6 7 |
components: securitySchemes: bearerAuth: # arbitrary name for the security scheme type: http scheme: bearer bearerFormat: JWT … |
We’re going to create the security scheme with the http type and bearer scheme. The bearerFormat field is optional and mostly used for documentation purposes. You can see my Java configuration below:
|
1 2 3 4 5 6 7 8 9 10 11 12 13 14 15 16 17 18 19 20 21 22 23 24 25 26 27 28 29 30 31 |
package in.keepgrowing.springbootswaggeruikeycloak.shared.infrastructure.config.swagger.authorization; import io.swagger.v3.oas.annotations.OpenAPIDefinition; import io.swagger.v3.oas.models.Components; import io.swagger.v3.oas.models.OpenAPI; import io.swagger.v3.oas.models.security.SecurityRequirement; import io.swagger.v3.oas.models.security.SecurityScheme; import org.springframework.context.annotation.Bean; import org.springframework.context.annotation.Configuration; @Configuration @OpenAPIDefinition public class SwaggerBearerConfig { private static final String SCHEME_NAME = "bearerAuth"; private static final String SCHEME = "bearer"; @Bean OpenAPI customOpenApi() { return new OpenAPI() .components(new Components() .addSecuritySchemes(SCHEME_NAME, createBearerScheme())) .addSecurityItem(new SecurityRequirement().addList(SCHEME_NAME)); } private SecurityScheme createBearerScheme() { return new SecurityScheme() .type(SecurityScheme.Type.HTTP) .scheme(SCHEME); } } |
As a result, I will see the Bearer Authorization in my Swagger UI:

Make sure that the token contains user roles that your API requires (realm_access or resource_access in the screenshot below):
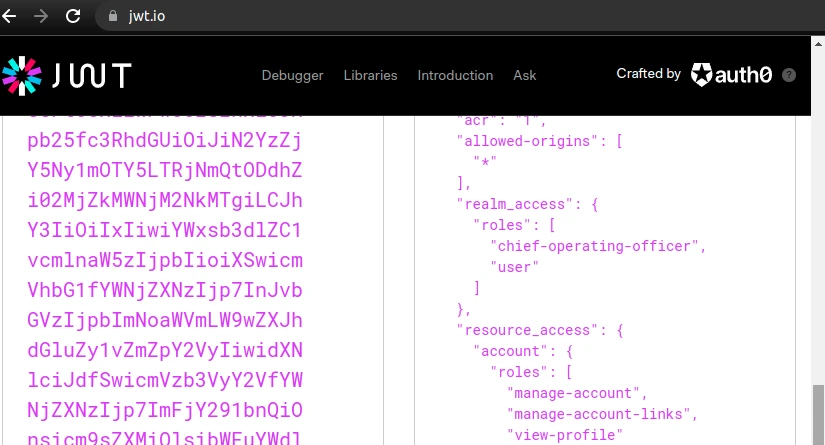
Why not other flows
Both implicit and password flows increase security risks and are therefore deprecated:
Please note that as of 2020, the implicit flow is about to be deprecated by OAuth 2.0 Security Best Current Practice. Recommended for most use case is Authorization Code Grant flow with PKCE.
https://spec.openapis.org/oas/latest.html#security-scheme-object
Because the client application has to collect the user’s password and send it to the authorization server, it is not recommended that this grant [password] be used at all anymore.
https://oauth.net/2/grant-types/password/
In addition, you can find more information in the Why not other flows section of the Kecloak in Docker #7 – How to authorize requests via Postman article.
Troubleshooting
What to check when API calls don’t work as planned?
The “Available authorizations” list is empty
An empty list of Available authorizations means that Swagger was unable to retrieve configuration from the OpenID server. You can debug the request responsible for loading Swagger UI in the browser:
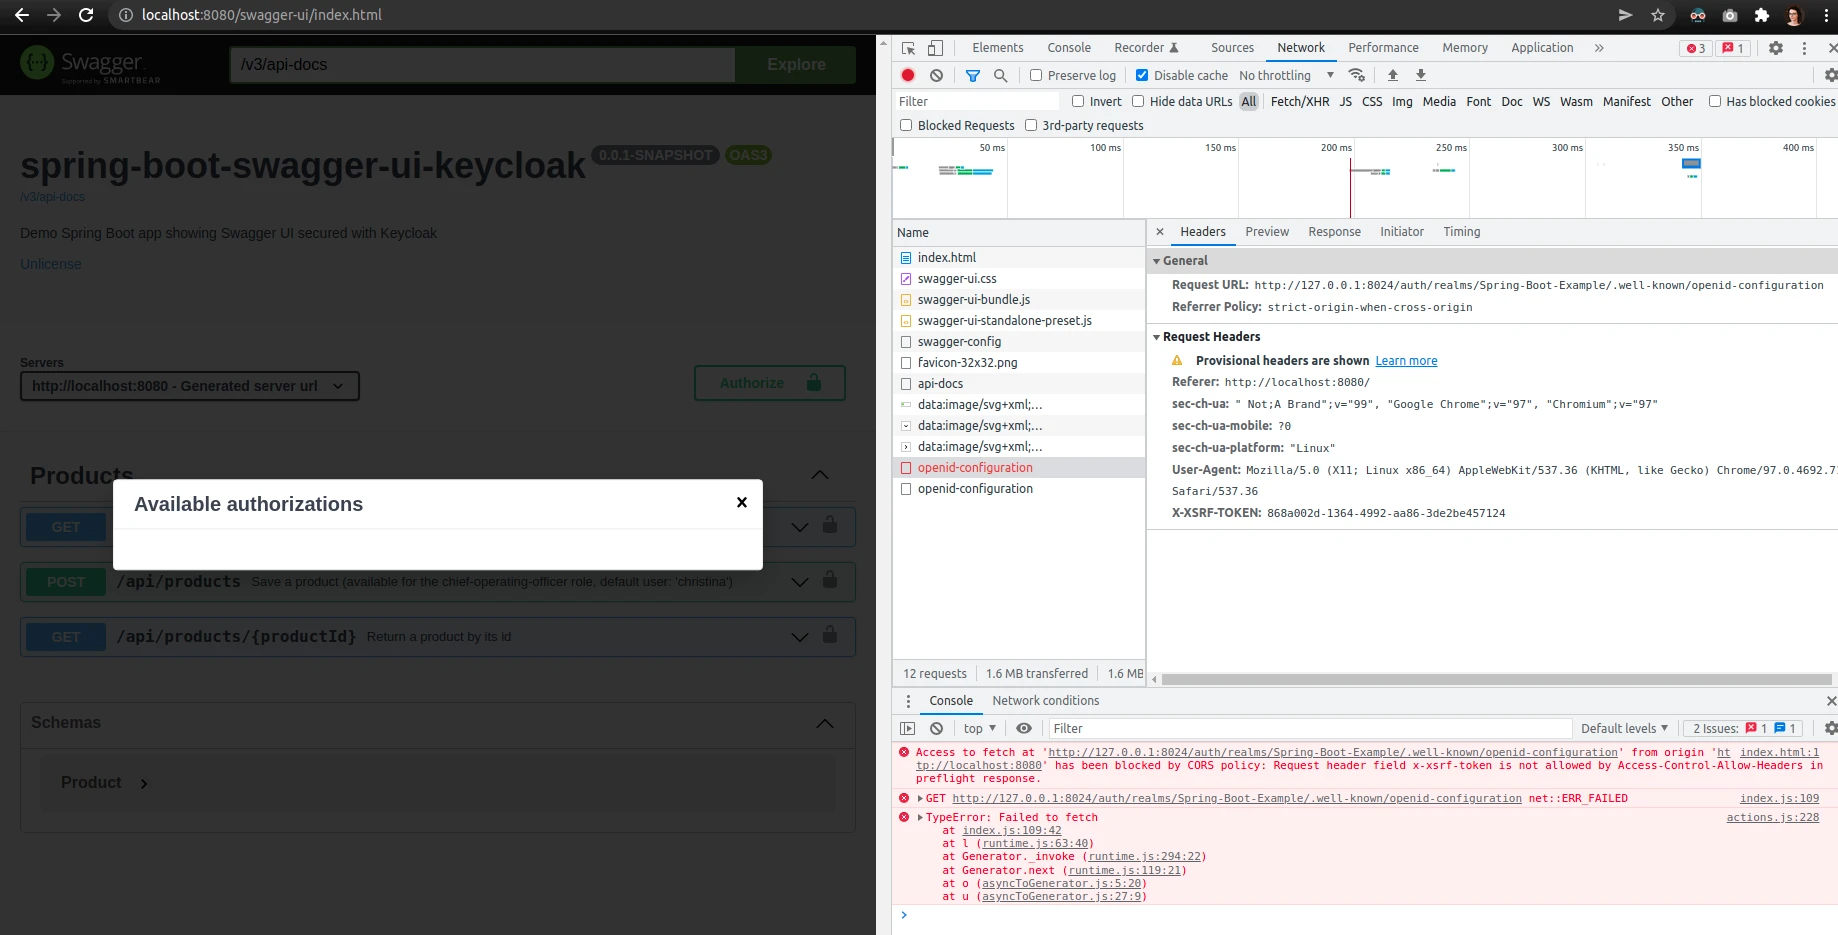
This failure was due to the XSRF header attached to the request. If you are using Springdoc with csrf protection enabled, be sure to update the library to at least version 1.6.6. I described this problem in the Is there a way to authorize users using OpenID Connect Discovery when POST endpoints require CSRF protection? issue.
CORS Error
“No Access-Control-Allow-Origin header is present on the requested resource” is an example CORS error that may appear in your browser if the Web Origins field is misconfigured in the Keycloak client:

Make sure to configure the Keycloak client to accept connections from the Swagger endpoint as shown in the following screenshot:

Another reason for this error is missing authorization data. You should see a lock icon next to a secured endpoint:

Furthermore, the request should contain a Bearer Token that you can see in the curl window:

If the endpoints are not secured, make sure that the proper scheme is provided as a SecurityRequirement:
|
1 2 3 |
… .addSecurityItem(new SecurityRequirement().addList(SAME_NAME_AS_USED_FOR_SECURITY_SCHEME)); … |
More on how to authorize requests from Swagger UI in Keycloak
- Additionally, you can find sample configurations for other Swagger authorizations in the spring-boot-swagger-ui-keycloak repository.
- What is the OAuth 2.0 Authorization Code Grant Type?
- Moreover, read the Keycloak Authentication Flows, SSO Protocols and Client Configuration article.
- Finally, check out the OpenApi 3 custom setup in Spring Boot using springdoc-openapi-ui example.
Photo by Yan Krukov from Pexels

This is an easy to follow tutorial on springboot keycloak authentication, and swagger documentation integration. Thank you