
An in-memory database may be sufficient during the early phase of project development. However, sooner or later you will need to persist some data. Read this post to learn how to configure a Spring Boot app to use a PostgreSQL database.
What we are going to build
For this article I’m going to use a Spring Boot project with one example endpoint. I will configure it to connect to a PostgreSQL database run from a docker container.
You can find the example project used in this post in the spring-boot-postgres-flyway repository.
Architecture overview
Our example REST API offers one endpoint that enables persisting data about bakery goods. The application relays on a PostgreSQL database that can be instantiated using the docker container that is included in the project. We use profile specific properties to separate configuration applied on the development environment. To examine the SQL commands run automatically against the database I generated the schema.sql file with the DDL script.
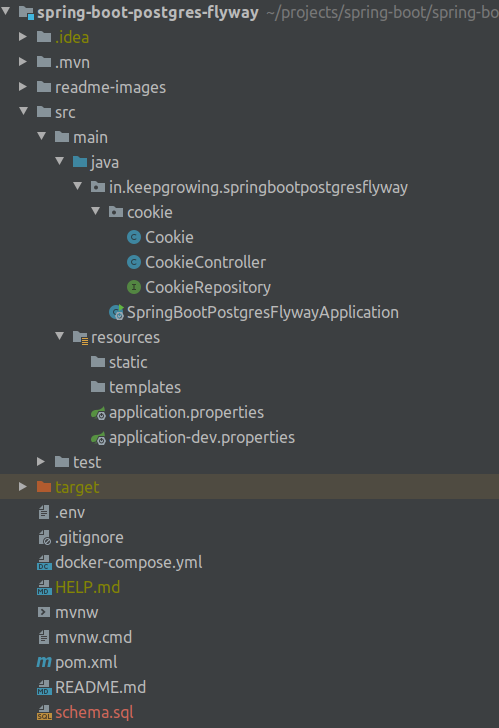
You can see the project directory tree on the image below:
Requirements
- We are working on a
Spring Boot 2.2.5project with theWebandJPAdependencies. You can read about setting up a similar project with Spring Initializr in How to create a new Spring Boot Project post. - OpenJDK 11
|
1 2 3 4 |
$ java --version openjdk 11.0.6 2020-01-14 OpenJDK Runtime Environment (build 11.0.6+10-post-Ubuntu-1ubuntu118.04.1) OpenJDK 64-Bit Server VM (build 11.0.6+10-post-Ubuntu-1ubuntu118.04.1, mixed mode, sharing) |
- A PostgreSQL database. You can use the container that is included in the repository and presented in the Setup a PostgreSQL database with Docker article. You will need Docker Engine – Community with Docker CLI for that.
Configure your application to connect to the database
We are going to instruct our app to work with a running PostgreSQL database. If you are using the docker-compose.yml file included in the project, don’t forget to start the container with the database instance.
Add the PostgreSQL dependency
Add the dependency for the driver for PostgreSQL database to your pom.xml file:
|
1 2 3 4 5 6 7 |
<!--pom.xml--> … <dependency> <groupId>org.postgresql</groupId> <artifactId>postgresql</artifactId> </dependency> … |
How to set up a database on the development environment
Connecting your application to a database requires providing credentials and a database url.
Default properties
The values from application.properties will be used unless they are overridden. In the default properties I specified the database dialect (optional):
|
1 2 3 |
# src/main/resources/application.properties … spring.jpa.database-platform=org.hibernate.dialect.PostgreSQLDialect |
If you place here values used for connecting to the local database, the app will work on your machine. In case you forget to supersede them on the production, the app won’t be able to connect to the “real” database.
Profile-specific properties
In my app I’m setting the profile-specific properties to make sure that none of the development properties will be applied to the production. I separated the attributes by creating two files: application.properties and application-dev.properties.
The properties for the PostgreSQL database run on my development environment looks like on the snippet below:
|
1 2 3 4 5 6 |
# src/main/resources/application-dev.properties spring.jpa.properties.javax.persistence.schema-generation.database.action=create … spring.datasource.url=jdbc:postgresql://localhost:5432/springbootpostgresflyway spring.datasource.username=db spring.datasource.password=admin |
Set development as the active profile
Now I have to set the active profile. I can do this in two ways. One relays on defining it in the default properties file:
|
1 2 |
# src/main/resources/application.properties spring.profiles.active=dev |
If several profiles are specified, a last-wins strategy applies. For example, profiles specified by the
https://docs.spring.io/spring-boot/docs/current/reference/html/spring-boot-features.html#boot-features-external-config-profile-specific-propertiesspring.profiles.activeproperty are added after those configured through theSpringApplicationAPI and therefore take precedence.
I have to remember to override the active profile when running the app on production.
Instead of defining the active profile in the application.properties file, you can edit the application configuration using your IDE. In IntelliJ, select Run → Edit Configuration from the menu and set the profile like on the image below:
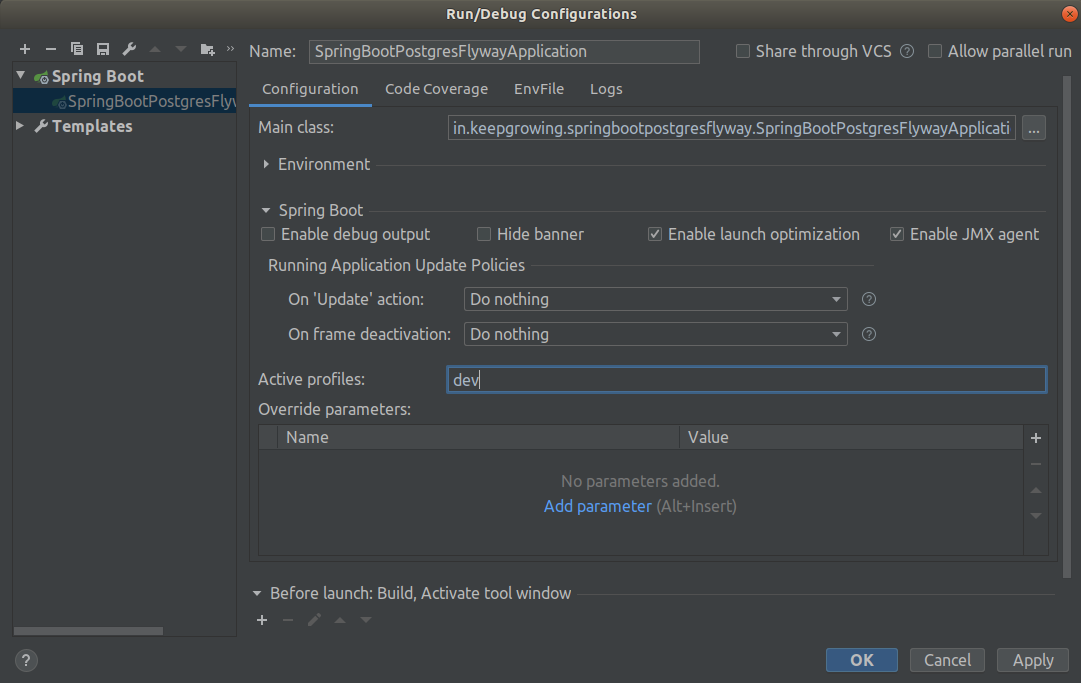
Thanks to this, the development properties will be applied only on your machine.
Properties explained
Below you will find description of the options used in my example and also some alternatives that you can apply in your projects.
spring.jpa.database-platform
The target database is auto-detected by default. You can specify the proper value on your own, as we can read in the docs:
The dialect to use is detected by the JPA provider. If you prefer to set the dialect yourself, set the
https://docs.spring.io/spring-boot/docs/current/reference/html/howto.html#howto-configure-jpa-propertiesspring.jpa.database-platformproperty.
spring.datasource.url, spring.datasource.username and spring.datasource.password
url is the JDBC URL of the database. Remember to keep the port, database name and credentials consistent with the database configuration. Make sure that the credentials from the dev environment are not accidentally used for the production.
javax.persistence.schema-generation.database.action
We use this property to define which action should be performed automatically on application startup. The default value is none, available options are listed in the documentation.
Use this property alongside with the schema.generation.script properties if you want to save the DDL schema to a file when starting the app. |
spring.jpa.hibernate.ddl-auto – the alternative property for creating a schema
You should follow a single schema generation approach. You can learn more in the Schema generation properties not well documented issue.
Instead of the javax.persistence.schema-generation.database.action property you could use the spring.jpa.hibernate.ddl-auto property to apply the JPA features for DDL generation on the application startup. The standard values are none, validate, update, create, and create-drop.
Be aware of differences in the default value for this property. As we can read in the Spring Boot documentation:
The
https://docs.spring.io/spring-boot/docs/current/reference/html/howto.html#howto-configure-jpa-propertiesspring.jpa.hibernate.ddl-autois a special case, because, depending on runtime conditions, it has different defaults. If an embedded database is used and no schema manager (such as Liquibase or Flyway) is handling theDataSource, it defaults tocreate-drop. In all other cases, it defaults tonone.
Run the application
You can now start the application and verify that it is connected to the database. In my example, Hibernate automatically creates tables based on my entities.
Verify the SQL commands
I store the DDL script in a file so I can easily examine the commands that were run against the database on application startup. Check out the Save Hibernate DDL schema to a file post to learn how you can do the same. The schema.sql file generated in my project looks like this:
|
1 2 3 4 5 6 |
-- schema.sql create table cookie ( id bigserial not null, flavour varchar(255), primary key (id) ) |
The file was not added to my repository. It will be generated in the project directory when you start your application.
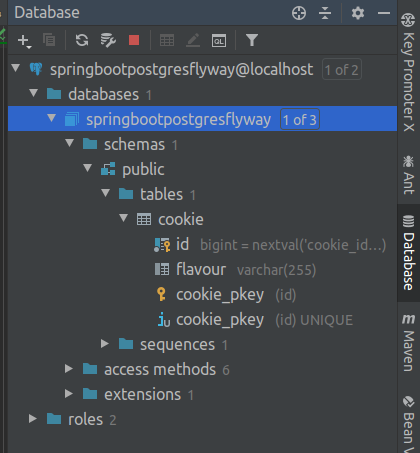
Verify the database schema
You can see the database schema on the screenshot taken from my IntelliJ on the image below:
The work done in this post in contained in the commit 84a88ff03f8b547d0a0fc608fa99586cc3f62cdc.
Disable automatic schema creation once the tables are initialized
You can keep recreating container and volume with the database content until you are satisfied with the outcome and all entities are polished. Once the schema is ready you can remove the property responsible for creating the tables – the javax.persistence.schema-generation.database.action property.
However, the schema will evolve during the project lifetime, so it is a good idea to implement a better solution for maintaining it. You can learn how to add migrations to this project in the Add the Flyway migrations to a Spring Boot project post.
Troubleshooting
Adjust the application model to the database requirements
If you are transferring the app from the in-memory database (e.g. h2) remember to adjust all entities to the target database requirements – they will be more strict. For example, you can encounter problems with reserved keywords used in the entities. Be sure to check out the database documentation to verify that no conflicts will arise during the database transition.
Make sure that you use the valid names for properties
Spring Boot allows us to set some vendor-independent configuration options provided by Spring Data JPA as external configuration properties for Hibernate. You can find the JPA properties in the documentation. Furthermore, you can check out this appendix with a list of common Spring Boot properties. When a property name is long it is easy to misspell it.
Use the right image version if you run the database with Docker
Make sure that the docker image version provides you with the database version that you actually want for the application.
Photo by Lucas Allmann on StockSnap