In case of complex projects it is often expected to provide different layouts adapted to the needs of users – the logged-in user requires different UI elements than the guest. We have to customise the appearance of applications time and again taking into account many various aspects. Angular allows you to organise the presentation layer to easily handle multiple layouts.
What we are going to build
Our application will provide two separate layouts – one served on a landing page view, the other used on a dashboard view. In this post we will display the default contents, just to present how to serve different components in isolated layouts.
To see the version with a horizontal navigation and a footer for the landing page and a vertical navigation for a dashboard, check out the Enhance the presentation layer of your multi-layout Angular app post, where all views are complemented with the appropriate html code and Bootstrap classes. The finished project is available in the following GitHub repository: little-pinecone/angular-multi-layout-scaffolding.
Requirements
| I try to keep the project up to date. Visit the releases list to keep track of the current versions of frameworks and libraries used. |
- Angular CLI – a command line interface tool that generates projects, components, modules, services.
I’m working on:
123456$ ng --versionAngular CLI: 6.0.8Node: 8.11.3OS: linux x64Angular: 6.1.1 - We will work on a freshly created Angular 6 project that uses the
scsspreprocessor and Bootstrap styles. To learn how to create such a project, visit the How to create a new Angular project post. If you want to change the preprocessor, read the How to change a CSS preprocessor in an Angular project post.
Design overview
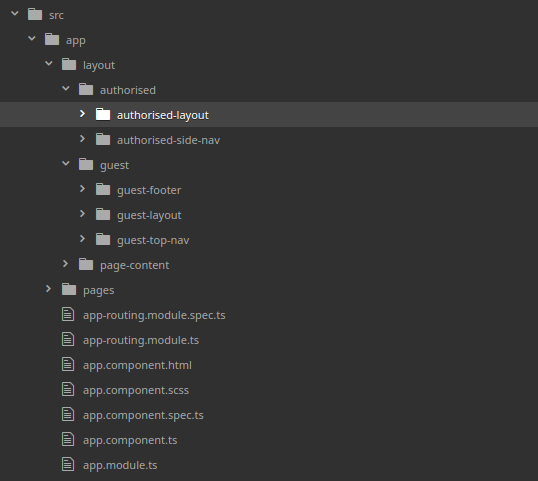
The layout folder will contain all components used to assemble the guest and authorised layouts and a component that is shared by both of them – PageContent. The actual content of two views – the landing page and the dashboard – is going to be stored in the pages folder. We are also going to create a routing module, so the layout served depends on the url.
You won’t find any authorisation logic in this example.
The final project src/ directory tree:

Angular CLI will create all parent folders for generated components – just remember to give the full path for a component.
Enable serving the content of different pages
To avoid code repetition and facilitate handling pages, we will create a component accessible for both layouts – the PageContent component:
|
1 |
$ ng generate component layout/page-content |
Replace the default content of the page-content.component.html with the following code:
|
1 2 |
<!-- src/app/layout/page-content/page-content.component.html --> <router-outlet></router-outlet> |
The work done in this section is contained in the commit 9d92b44a7c2b620e0d5391b7cd89ecf47cb88b58.
Manage the guest layout
Create the layout components
Create the component for the top navigation:
|
1 |
$ ng generate component layout/guest/guest-top-nav |
Create the component for the footer:
|
1 |
$ ng generate component layout/guest/guest-footer |
Bind the navigation, page content and footer within the guest layout:
|
1 |
$ ng generate component layout/guest/guest-layout |
Replace the content of the guest-layout.component.html with the following code:
|
1 2 3 4 5 6 |
<!-- src/app/layout/guest/guest-layout/guest-layout.component.html --> <div> <app-guest-top-nav></app-guest-top-nav> <app-page-content></app-page-content> <app-guest-footer></app-guest-footer> </div> |
Generate the component for our landing page:
|
1 |
$ ng generate component pages/landing-page |
Add routing to a page with the guest layout
Prepare the routing module file
The following steps are well covered in the official Angular tutorial.
Let’s create a routing module in the main directory of the project:
|
1 |
$ ng generate module app-routing --flat --module=app |
Angular CLI will create required files in the app/ folder and register the new module in the imports array of the AppModule.
In the app-routing.module.spec.ts file we can delete @NgModule.declarations array and CommonModule references:
|
1 2 3 4 5 6 7 8 9 10 11 |
// src/app/app-routing.module.spec.ts … import { CommonModule } from '@angular/common'; //delete this line … @NgModule({ imports: [ CommonModule //delete this line ], declarations: [] //delete this line }) … |
From the @angular/router library import RouterModule and Routes:
|
1 2 3 4 |
// src/app/app-routing.module.spec.ts … import { RouterModule, Routes} from '@angular/router'; … |
Add @NgModule.exports array with RouterModule in it:
|
1 2 3 4 5 6 7 |
// src/app/app-routing.module.spec.ts … @NgModule({ imports: [], exports: [ RouterModule ] }) … |
Add routes
We will need two separate sections for routes, but for now we can handle only the guest layout. Import GuestLayoutComponent and LandingPageComponent and add the following route to the routes array:
|
1 2 3 4 5 6 7 8 9 10 11 12 13 14 15 16 17 |
// src/app/app-routing.module.spec.ts import { NgModule } from '@angular/core'; import { RouterModule, Routes} from '@angular/router'; import { GuestLayoutComponent } from './layout/guest/guest-layout/guest-layout.component'; import { LandingPageComponent } from './pages/landing-page/landing-page.component'; const routes: Routes = [ { path: '', component: GuestLayoutComponent, children: [ { path: '', component: LandingPageComponent, pathMatch: 'full'}, ] }, ]; … |
Add RouterModule.forRoot(routes) to the @NgModule.imports array:
|
1 2 3 4 5 6 7 |
// src/app/app-routing.module.spec.ts … @NgModule({ imports: [ RouterModule.forRoot(routes) ], exports: [ RouterModule ] }) export class AppRoutingModule { } |
Do not display the default Angular page
We want to change the content displayed on http://localhost:4200/ – from the default Angular page to our landing page. Replace the content of app.component.html with the following code:
|
1 2 |
<!-- src/app/app.component.html --> <router-outlet></router-outlet> |
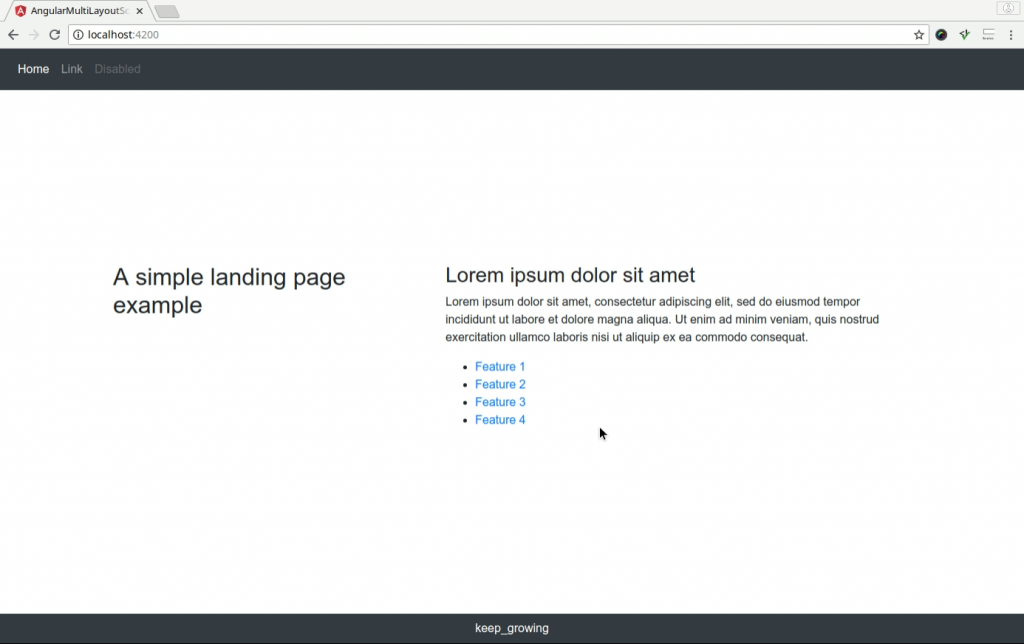
Check out the landing page of your app on http://localhost:4200/:

The work done in this section is contained in the commit a5cb113c477777dd266457341313e070999d930e.
Troubleshooting
Make sure that the CLI is tracking changes, refresh the browser window with Ctrl+F5 or restart the Angular server if you can’t see the effect.
Fix the tests
If you run the following command:
|
1 |
$ ng test |
you will see that the default test set from app.component.spec.ts fails. Let’s investigate the errors:
<router-outlet>is not recognised
12AppComponent should create the appFailed: Template parse errors: 'router-outlet' is not a known element
Importing RouterTestingModule to thepage-content.component.spec.tsandapp.component.spec.tsfiles provides the Router mock:
12345678910// src/app/layout/page-content/page-content.component.spec.tsimport { RouterTestingModule } from '@angular/router/testing'; // add this line…beforeEach(async(() => {TestBed.configureTestingModule({declarations: [ PageContentComponent ],imports: [ RouterTestingModule ], // add this line}).compileComponents();}));- A component with nested components
12345GuestLayoutComponent should createFailed: Template parse errors:'app-guest-top-nav' is not a known element'app-page-content' is not a known element'app-guest-footer' is not a known element
The guest-layout template have nested components – they should have their own tests so we can exclude them from testing inguest-layout. Import Component, create mocks and add the mocked components to thedeclarationssection:
12345678910111213141516171819202122232425// src/app/layout/guest/guest-layout/guest-layout.component.spec.ts…import { Component } from '@angular/core';@Component({selector: 'app-guest-top-nav', template: ''})class GuestTopNavComponent {}@Component({selector: 'app-page-content', template: ''})class PageContentComponent { }@Component({selector: 'app-guest-footer', template: ''})class GuestFooterComponent {}…beforeEach(async(() => {TestBed.configureTestingModule({declarations: [GuestLayoutComponent,GuestTopNavComponent,PageContentComponent,GuestFooterComponent]}).compileComponents();}));…
You can apply NO_ERRORS_SCHEMA instead, but it will hide other errors – missing components and attributes that you overlooked or misspelled. - Missing html content
12AppComponent should render title in a h1 tagFailed: Cannot read property 'textContent' of null
We altered the html that is tested- adjusting the content expected by tests fixes the problem. Furthermore, we can remove all tests from theapp.component.spec.tsfile – except the one testing the creation of the app:
12345678// src/app/app.component.spec.ts…it('should create the app', async(() => {const fixture = TestBed.createComponent(AppComponent);const app = fixture.debugElement.componentInstance;expect(app).toBeTruthy();}));});
AppComponent, GuestLayoutComponent and PageContentComponent don’t have any logic or html elements to test – we only need to verify whether they were created. You can read more about testing components in the official guide.
The work done in this section is contained in the commit c4e7e2d570c6fed56a5db249325710f5b620074d.
Troubleshooting
If the errors remain, try terminating the testing process and run the $ ng test command again.
Manage the layout for an authorised user
Create the component for the side navigation:
|
1 |
$ ng generate component layout/authorised/authorised-side-nav |
Bind the navigation and page content within the layout for and authorised user:
|
1 |
$ ng generate component layout/authorised/authorised-layout |
Replace the content of the authorised-layout.component.html with the following code:
|
1 2 3 4 5 |
<!-- src/app/layout/authorised/authorised-layout/authorised-layout.component.html --> <div> <app-authorised-side-nav></app-authorised-side-nav> <app-page-content></app-page-content> </div> |
Generate a component for the dashboard page:
|
1 |
$ ng generate component pages/dashboard |
Add routing to the dashboard page
Import AuthorisedLayoutComponent and DashboardComponent and add the following route to the routes array:
|
1 2 3 4 5 6 7 8 9 10 11 12 13 14 15 16 |
// src/app/app-routing.module.ts … import { AuthorisedLayoutComponent } from './layout/authorised/authorised-layout/authorised-layout.component'; import { DashboardComponent } from './pages/dashboard/dashboard.component'; const routes: Routes = [ … { path: '', component: AuthorisedLayoutComponent, children: [ { path: 'dashboard', component: DashboardComponent }, ] }, ]; … |
Check out the authorised layout on http://localhost:4200/dashboard:

The work done in this section is contained in the commit 7fd037e2ea0ed74f176dd7a1edee6b3740560b80.
Update the tests
If you run the following command:
|
1 |
$ ng test |
you will see that the tests from authorised-layout.component.spec.ts fail. Again, we encounter the error caused by the nested components:
|
1 2 3 4 |
AuthorisedLayoutComponent should create Failed: Template parse errors: 'app-authorised-side-nav' is not a known element 'app-page-content' is not a known element |
The authorised-layout template have nested components – they should have their own tests so we can exclude them from testing in authorised-layout. Import Component, create mocks and add the mocked components to the declarations section:
|
1 2 3 4 5 6 7 8 9 10 11 12 13 14 15 16 17 18 19 20 21 |
// src/app/layout/authorised/authorised-layout/authorised-layout.component.spec.ts … import { Component } from '@angular/core'; @Component({selector: 'app-authorised-side-nav', template: ''}) class AuthorisedSideNavComponent {} @Component({selector: 'app-page-content', template: ''}) class PageContentComponent { } … beforeEach(async(() => { TestBed.configureTestingModule({ declarations: [ AuthorisedLayoutComponent, AuthorisedSideNavComponent, PageContentComponent ] }) .compileComponents(); })); … |
The work done in this section is contained in the commit 24cba57ee1b58b8c1abb6110212c6f78d71fd021.
Troubleshooting
If the errors remain, try terminating the process and run the $ ng test command again.
What is next?
Add html content and styles to the landing page, dashboard and both layouts components. Check out the Enhance the presentation layer of your multi-layout Angular app post or visit the project repository to see how to style the pages:

Photo by Toa Heftiba on StockSnap

Hi Marta,
you saved my time 🙂
thanks a lot
thanks for your tutorial I have two different layout user layout and dashboard both have different files and build in CSS can you explain how to integrate both of them incorrect way. thanks in advance.
very cool.
thanks 🙂
I followed your tutorial and Want to achieve the same thing. Please check this question I asked on stackoverflow, maybe you can help.
https://stackoverflow.com/q/65365743/10587542