
With Spring Initializr you can bootstrap a new Spring Boot application swiftly. Let’s create a fresh project from scratch using just Web and MySQL dependencies.
What we are going to build
We will bootstrap a fresh project with basic dependencies required for a web application.
Requirements
You will need Java SDK v1.8 or higher. If this is your first java project, install Java Development Kit:
|
1 |
$ sudo apt-get install openjdk-8-jdk |
To check which version is installed on your computer, run:
|
1 |
$ javac -version |
You will be coding in an integrated development environment. Choose the one that supports Java8, JavaScript, HTML, is compatible with Git and enables you to build, debug, and run tests with ease. For the IDE I recommend IntelliJ IDEA Community Edition, but you can choose Eclipse, Netbeans or whichever you like.
This tutorial’s project is created on Kubuntu – remember to adjust commands if you don’t work on Linux OS.
Setting up the project
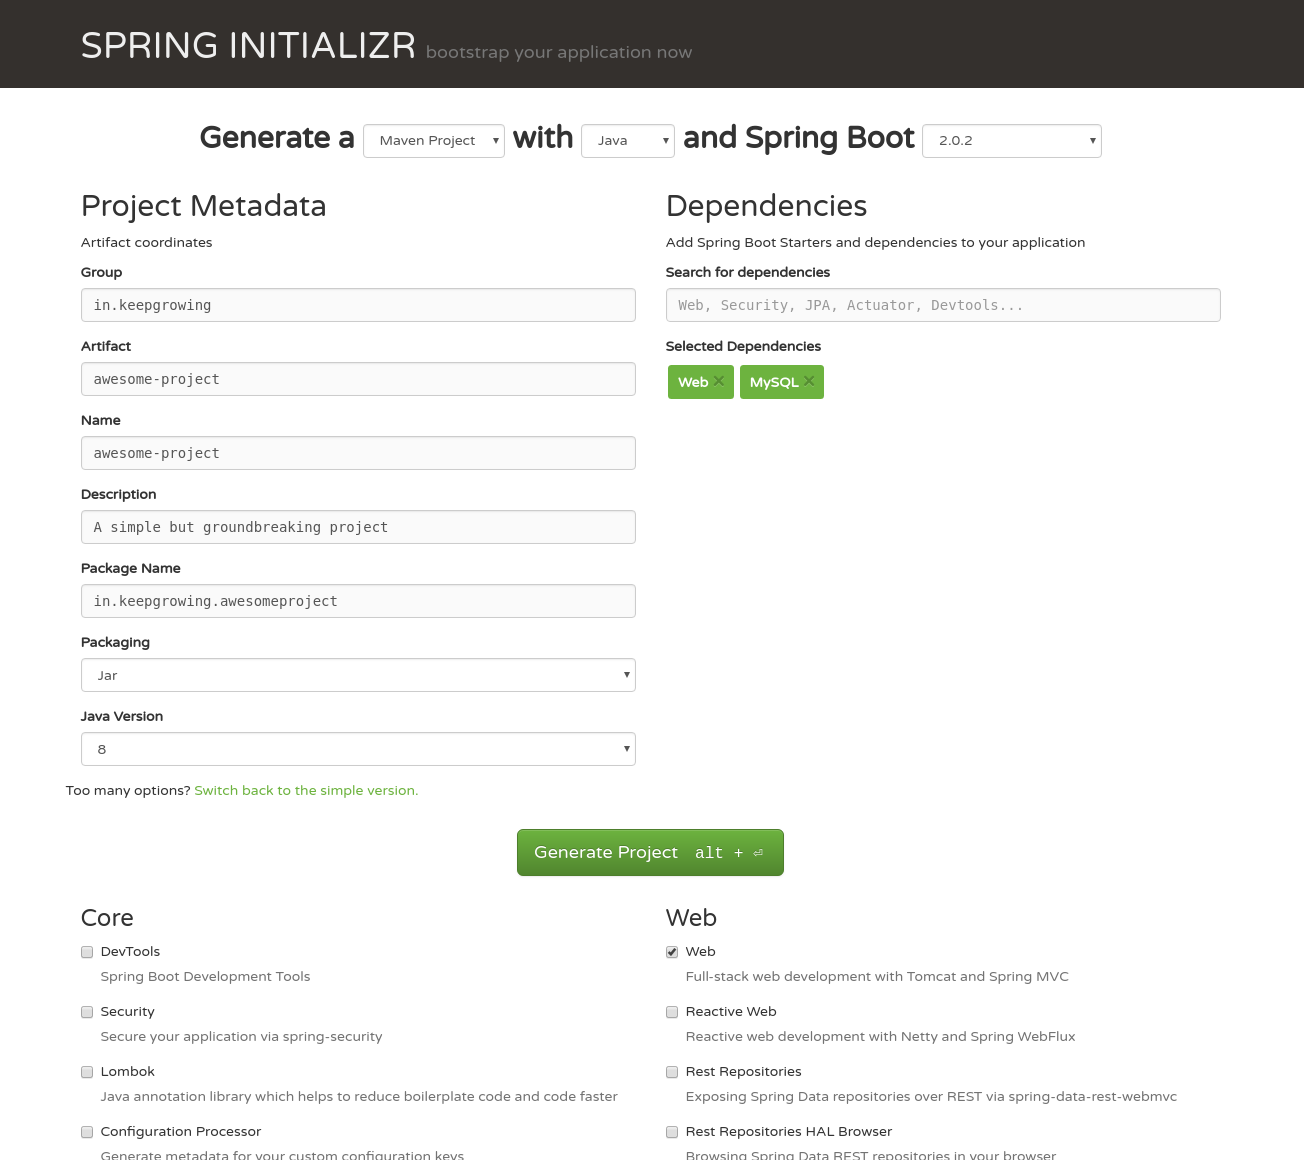
Spring Initializr provides a simple web UI allowing you to customize the project, specify its dependencies and download an already bootstrapped application.
Visit start.spring.io/, insert :
- the name of the project’s
Group– usually it is the inversed domain of your company and is used as a default root package of the app; - project’s name into the
Artifactfield – if the name of your project ismy-app, the generated project will have aMyAppApplication.javaclass with amain()method to bootstrap the application; - short
Descriptionof the application.
If you won’t specify Package Name, the value of the Group attribute is used for the root package of the project. In our case, the path to the class with a main() method will look like this:
awesome-project/src/main/java/in/keepgrowing/awesomeproject/AwesomeProjectApplication.java
To select Web and MySQL dependencies, place the cursor in the Search for dependencies field, start typing those names and pick out the packages from the list of matching choices.
You can also explore advanced options of Spring Initializr by clicking the Switch to the full version link below the Generate Project button.
Generate the project and save the zip file on your machine. Go to your project location and unzip the file:
|
1 |
little_pinecone:~/projects/spring_boot$ unzip ~/Downloads/awesome-project.zip |
To see the structure of the downloaded demo go to the project directory and list the application files:
|
1 2 3 4 5 6 7 8 9 10 |
$ cd awesome-project/ $ ls -la . .. .gitignore .mvn mvnw mvnw.cmd pom.xml src |
To finally test the project installation, create a simple controller displaying a greeting message:
|
1 2 3 4 5 6 7 8 9 10 11 12 13 14 15 |
// awesome-project/src/main/java/in/keepgrowing/awesomeproject/Controller/LandingPageController.java package in.keepgrowing.awesomeproject.Controller; import org.springframework.web.bind.annotation.RequestMapping; import org.springframework.web.bind.annotation.RestController; @RestController public class LandingPageController { @RequestMapping("/") public String greeting() { return "Welcome on the landing page!"; } } |
You need to debug and run the application. If you chose awesome-project as the name of your application in Spring Initializr, go to AwesomeProjectApplication.java, click the green arrow on the left of the class declaration and select Debug 'AwesomeProject...main()' option:
|
1 |
// awesome-project/src/main/java/in/keepgrowing/awesomeproject/AwesomeProjectApplication.java |
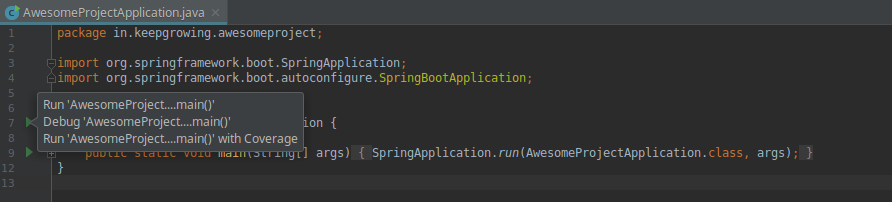
You should get the console output with the Tomcat port, mine is:
|
1 |
TomcatWebServer : Tomcat started on port(s):8080. |
Visit http://localhost:8080/ in your browser and check for the LandingPageController output: Welcome on the landing page!
You should now store your project in a git repository. Check out this tutorial on starting with git.
Photo by Nick Scheerbart on StockSnap